| Ryona | 12-19-2005 02:18 PM |
I decided to start an art tutorial thread since someone asked me to.
I and hopefuly other artists will share with everyone our basic and special and maybe even some of our secret techniques.
If you're willing to learn, we're willing to help.
Here's the basics to being an excellent artist.
First and foremost, before you even start drawing, you need to study and practice with an art tool first.
My specialty tool is the pencil, so that's what I'll have you all start with.
Proper grip is important. You need a comfortable and secure grip to reduce possible cramping in the hand.
Grab some paper and practice making slashes on it with your pencile.
Make long slashes, short slashes, quick rapid slashes, and slow precise slashes.
Work on the amount of pressure you put in the slashes. Make soft light slashes, hard crisp slashes, and everything else in between.
Try to get comfortable with your ability to manipulate the amount of force you put into the pencil.
After you get comfortable with that, start forming shapes. First work on circles and straight lines, then move on to more complex shapes when you get more comfortable with your skill.
Take your time and practice alot.
If you feel that your level is high enough, you can take on this challange now.
Here's an image made up of nine stages. Don't worry. I'll guide you through it.
*note: information and advice will be at the bottom of each stage. Feel free to look at all the stages first to get a good idea of what you're working on*
Image 1: Girl
READY...
GO!
---------------------------------------------------------------
Stage 1

Ok, here you'll need to make a circle and a line. Don't worry about it looking neat and clean. These are only guide lines and will be removed later.
Use several curved slashes until you have a good circular shape.
Use several straight slashes until you have a nice straight line.
Don't worry; they're supposed to look rough.
--------------------------------------------------------------
Stage 2

Draw the shape of the chin/jaw line (Remember, use several slashes to refine lines). Then draw two lines across the face.
The space between those two lines is where the eyes will go.
Draw a cylinder-like shape for the neck. Be sure to make the neck narrow.
-------------------------------------------------------------
Stage 3

Draw oval-like shapes for the eyes. Be sure to leave a space between the eyes that would be able to fit another eye of the same size in the middle.
Draw faintly where the mouth and nose will go. Remember, the mouth and nose are very small and made up of simple lines.
When drawing the ears, be sure that the top ends of the ears are lined up with the top of the eyes, and the bottom ends of the ears are lined up with the bottom of the nose.
Draw in the eyebrows. Make sure to draw the Eyebrows longer than the eyes.
-------------------------------------------------------------
Stage 4
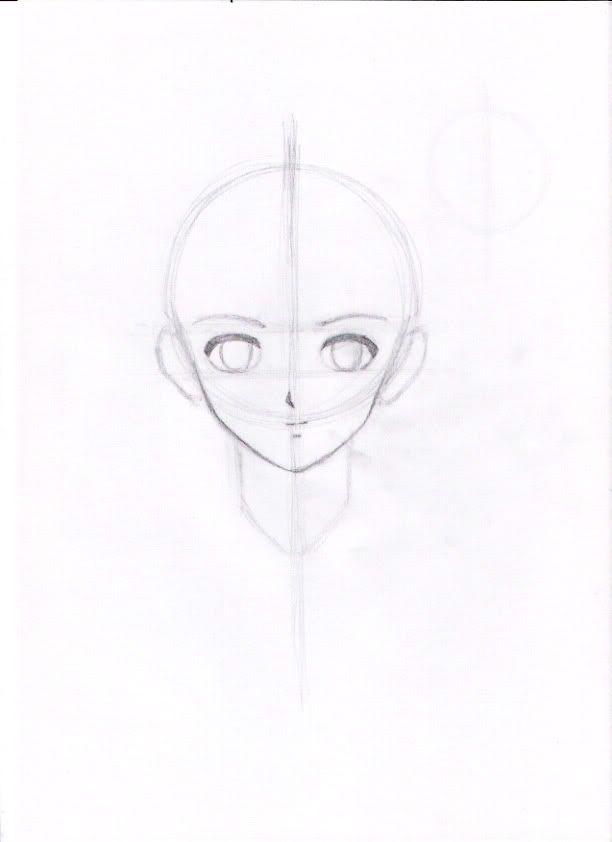
Draw solid thick shapes for the eye lashes. Then draw circular shapes for the pupil/iris of the eyes.
Refine the mouth and nose (remember to keep them simple).
Refine the chin/jaw line.
Draw a slight little shadow below the mouth to represent the bottom lip.
-------------------------------------------------------------
Stage 5

Draw a shape to represent the upper torso. Be sure to draw the upper torso narrow and a bit on the small side.
Draw to circles to represent the shoulders.
Draw a line across the torso from the tops of the circles/shoulders. This line is a guide for the collor bone.
Draw a rough shape for the hair.
------------------------------------------------------------
Stage 6
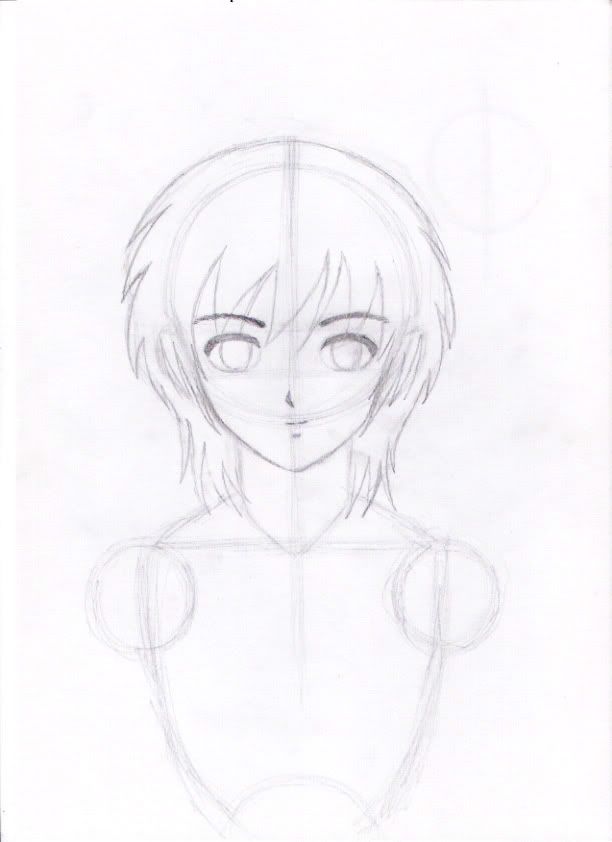
Refine the shape of the hair.
Don't waste your time drawing strands and strands of hair. Draw them in clumps. Keep it simple!
-----------------------------------------------------------
Stage 7
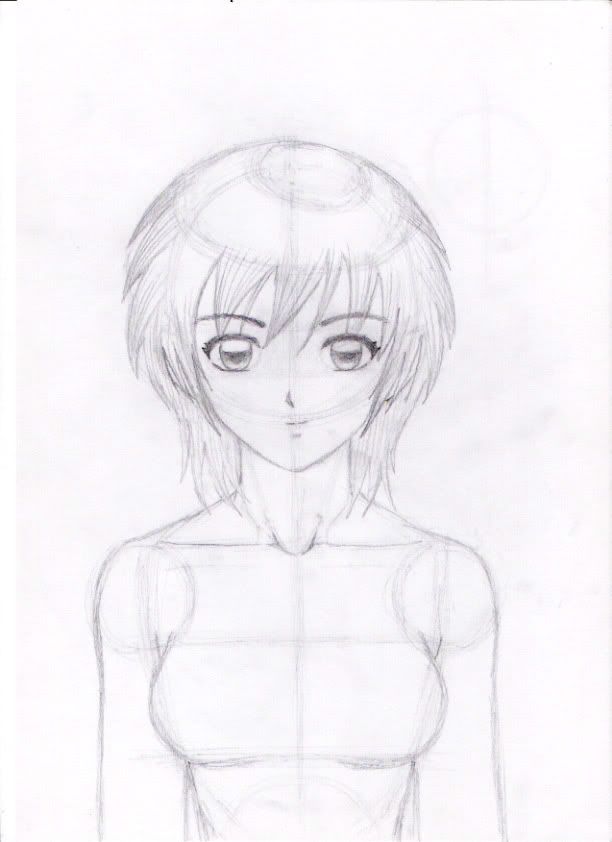
Start to refine the body. Draw in the arms. Refine the collor bone.
Draw a line across the torso from the bottoms of the circles/shoulders. Then draw another line below that line with enough space that you can start to see square-like shape made up of that line, the collor bone, and the sides of the torso.
Draw in two curves between those two new lines. These curves represent the breasts (Hey! Get that smirk off your face!).
Now, lightly draw a small oval on the top of the head (wear the hair would spread from the center) and draw a curve below the oval. The space between these two new lines is where the shine of the hair will go.
Start to do quick slashes in the hair. Start from the tips and move up towards the crown of the head. Don't worry if some of the lines cross over each other. It will make the hair look more realistic.
Also, do quick slashes from the center of the hair (top of the head, slightly on the right side) down-wards.
Draw a curve in each pupil/iris and fill in and shade the space below the new curves. Leave it light at the bottom.
-------------------------------------------------------------
Stage 8

Continue to draw in more and more slashes in the hair.
At this point check to see any Permanent lines that me be fading. Re-touch them if you have to.
-------------------------------------------------------------
Stage 9
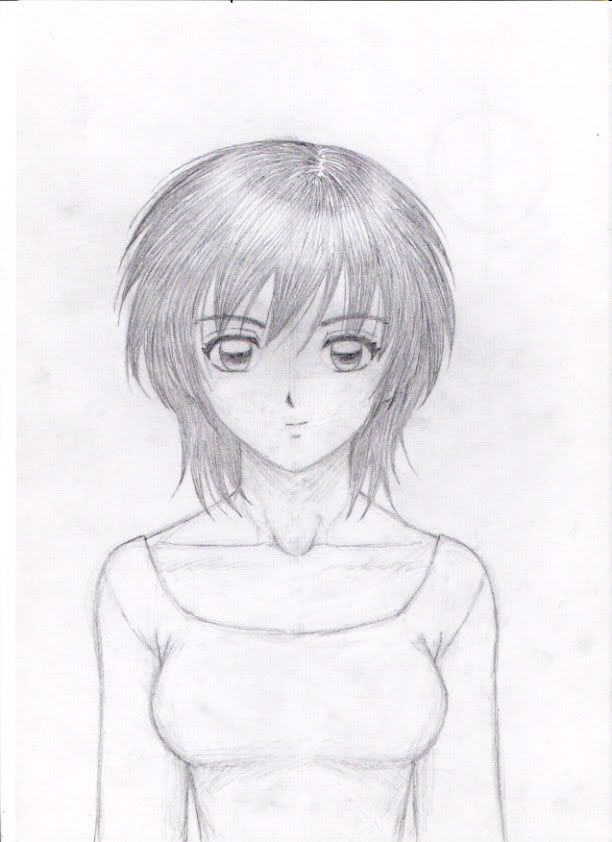
Keep adding more slashes until all the hair is filled and has a nice ring of shine around the head.
Draw in a neck-hole for a shirt.
Carefully erase the guide lines (Don't bother erasing all the guide lines. Some will be difficult to reach. Anyway, by this point, some of them should have faded away by now).
Refine the whole picture and add some detail. Add some light shadow on the neck below the face, on the sides of the torso and inside sides of the arms, and under the breasts. (Hey! Now what did I just say a while back?)
*Here's a full size pic that will fit on the screen*
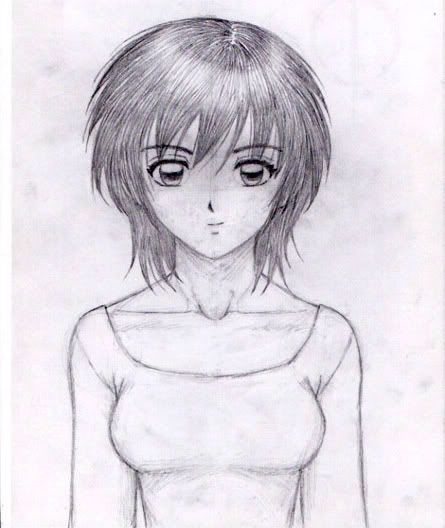
FINNISHED!
Ahh, now that wasn't so bad, was it?
Ok, well we're not exactilly finnished just yet.
Please show us your pic so we can examine it. Don't be shy! Remember, we're all here to help. It's important that we see how far you've come so far so we can help fine tune your skill, techniques and abilities.
Also, please let me know what you thought of my tutorial. Was it helpful?
I and hopefuly other artists will share with everyone our basic and special and maybe even some of our secret techniques.
If you're willing to learn, we're willing to help.
Here's the basics to being an excellent artist.
First and foremost, before you even start drawing, you need to study and practice with an art tool first.
My specialty tool is the pencil, so that's what I'll have you all start with.
Proper grip is important. You need a comfortable and secure grip to reduce possible cramping in the hand.
Grab some paper and practice making slashes on it with your pencile.
Make long slashes, short slashes, quick rapid slashes, and slow precise slashes.
Work on the amount of pressure you put in the slashes. Make soft light slashes, hard crisp slashes, and everything else in between.
Try to get comfortable with your ability to manipulate the amount of force you put into the pencil.
After you get comfortable with that, start forming shapes. First work on circles and straight lines, then move on to more complex shapes when you get more comfortable with your skill.
Take your time and practice alot.
If you feel that your level is high enough, you can take on this challange now.
Here's an image made up of nine stages. Don't worry. I'll guide you through it.
*note: information and advice will be at the bottom of each stage. Feel free to look at all the stages first to get a good idea of what you're working on*
Image 1: Girl
READY...
GO!
---------------------------------------------------------------
Stage 1
Ok, here you'll need to make a circle and a line. Don't worry about it looking neat and clean. These are only guide lines and will be removed later.
Use several curved slashes until you have a good circular shape.
Use several straight slashes until you have a nice straight line.
Don't worry; they're supposed to look rough.
--------------------------------------------------------------
Stage 2
Draw the shape of the chin/jaw line (Remember, use several slashes to refine lines). Then draw two lines across the face.
The space between those two lines is where the eyes will go.
Draw a cylinder-like shape for the neck. Be sure to make the neck narrow.
-------------------------------------------------------------
Stage 3
Draw oval-like shapes for the eyes. Be sure to leave a space between the eyes that would be able to fit another eye of the same size in the middle.
Draw faintly where the mouth and nose will go. Remember, the mouth and nose are very small and made up of simple lines.
When drawing the ears, be sure that the top ends of the ears are lined up with the top of the eyes, and the bottom ends of the ears are lined up with the bottom of the nose.
Draw in the eyebrows. Make sure to draw the Eyebrows longer than the eyes.
-------------------------------------------------------------
Stage 4
Draw solid thick shapes for the eye lashes. Then draw circular shapes for the pupil/iris of the eyes.
Refine the mouth and nose (remember to keep them simple).
Refine the chin/jaw line.
Draw a slight little shadow below the mouth to represent the bottom lip.
-------------------------------------------------------------
Stage 5
Draw a shape to represent the upper torso. Be sure to draw the upper torso narrow and a bit on the small side.
Draw to circles to represent the shoulders.
Draw a line across the torso from the tops of the circles/shoulders. This line is a guide for the collor bone.
Draw a rough shape for the hair.
------------------------------------------------------------
Stage 6
Refine the shape of the hair.
Don't waste your time drawing strands and strands of hair. Draw them in clumps. Keep it simple!
-----------------------------------------------------------
Stage 7
Start to refine the body. Draw in the arms. Refine the collor bone.
Draw a line across the torso from the bottoms of the circles/shoulders. Then draw another line below that line with enough space that you can start to see square-like shape made up of that line, the collor bone, and the sides of the torso.
Draw in two curves between those two new lines. These curves represent the breasts (Hey! Get that smirk off your face!).
Now, lightly draw a small oval on the top of the head (wear the hair would spread from the center) and draw a curve below the oval. The space between these two new lines is where the shine of the hair will go.
Start to do quick slashes in the hair. Start from the tips and move up towards the crown of the head. Don't worry if some of the lines cross over each other. It will make the hair look more realistic.
Also, do quick slashes from the center of the hair (top of the head, slightly on the right side) down-wards.
Draw a curve in each pupil/iris and fill in and shade the space below the new curves. Leave it light at the bottom.
-------------------------------------------------------------
Stage 8
Continue to draw in more and more slashes in the hair.
At this point check to see any Permanent lines that me be fading. Re-touch them if you have to.
-------------------------------------------------------------
Stage 9
Keep adding more slashes until all the hair is filled and has a nice ring of shine around the head.
Draw in a neck-hole for a shirt.
Carefully erase the guide lines (Don't bother erasing all the guide lines. Some will be difficult to reach. Anyway, by this point, some of them should have faded away by now).
Refine the whole picture and add some detail. Add some light shadow on the neck below the face, on the sides of the torso and inside sides of the arms, and under the breasts. (Hey! Now what did I just say a while back?)
*Here's a full size pic that will fit on the screen*
FINNISHED!
Ahh, now that wasn't so bad, was it?
Ok, well we're not exactilly finnished just yet.
Please show us your pic so we can examine it. Don't be shy! Remember, we're all here to help. It's important that we see how far you've come so far so we can help fine tune your skill, techniques and abilities.
Also, please let me know what you thought of my tutorial. Was it helpful?
 . At any rate since animating is my specialty i have used your character design and have begun animating it. The final "starting" picture for the animation took roughly 5 hours to complete. however it turned out nice so the amount of time it took to complete is not that bad. With a single shot such as the one posted i should be able to make her wink
  or do a multitude of other facial expressions .I will post what i have in a little if any one wants to see it.


